

Create menus with DHTMLMenu
So you want to create one of those wiz-bang menus that drop down when you hover over them, or pop out, pop up, whatever. These are called DHTML menus, which basically means you can interact with it to find what you need. The only trouble is, they're not the easiest things in the world to create even if you're an expert. So, you gotta go looking for a script somewhere which will work cross browser (meaning, it works in more than just IE browsers!). DHTML menu scripts are hard to find when you are looking for a particular type, then you gotta have the know-how to edit it so it does what you want and looks how you want it to look. Me? I avoided DHTML menus like the plague, because I know what hassle they involve.
Then I found what I didn't know I'd been looking for - a great program that creates many different kinds of DHTML menus for you, all from an easy-to-use GUI! The program is DHTMLMenu from Sothink, and this was the answer to my DHTML menu prayers (the ones I didn't know I needed to say!) as I can now create DHTML menus looking exactly how I want them, without having to wrestle with indeciperable javascript code. I love the program so much, I decided to take the time to explain how to create a basic menu in it so you can see how easy it is to use too. This won't be an in-depth-tell-all tute as I'm sure you can make some wonderfully complex menus. It will, however, show you how to create a DHTML menu in less time than it would probably take you to find a script that suits you on the net. You can also download extensions so it can be used in Dreamweaver etc.
Here we go....
First of all, you need to download DHTMLMenu. Choose the 'Download demo' button. Install the program, then you're set to go.
Open up DHTMLMenu and you will be faced with the interface that is used to create custom DHTML menus. It consists of the following areas:
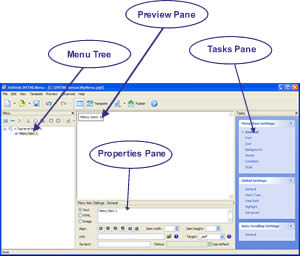 Menu Tree
This shows your menu in a tree-like structure. You can see each menu item and what level it is sitting on. This is where you add extra menu items.
The preview window allows you to view your menu as you create it or make changes. It is automatically update as you make changes to the menu (you can set it to not automatically update if you wish).
This is where you can view the different settings of your menu items. Click on a menu item in the menu tree or preview window and you can then view what settings it has, or change the settings.
This lists all the tasks you can perform for the menu item selected.
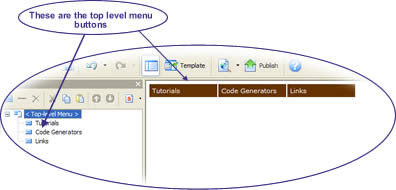
Top-level Menu
On opening DTHMLMenu, you will see
Click the 'General' link in the Tasks Pane and change the padding to 5, and the spacing to 0. This will give us a seamless menu. Change 'display' to 'horizontally'. This creates a menu which goes across the page, as opposed to a vertical one which goes down the page and opens to the side. Of course, you can choose a vertical one if you wish! After you've done this, click the 'Border' link and leave the Border width at 1, but change the border colour to #FFFFFF.
This finishes the changes we're going to make for the Top Level Menu
Menu Item 1
We will be creating a text menu as opposed to an image menu. Click on 'Menu Item 1' in the menu tree and you will see the properties for that menu item in the properties panel.
You can change the text for the menu item in the text area within the Properties Pane (make sure the 'text' radio button is selected). Highlight all of the text (Menu Item 1) in the textarea of the Properties Pane then delete it. You can then type in the text for your first button. I have used the text 'Tutorials'. You will notice that the menu item in the Menu Tree changes to 'Tutorials' (or whatever you set it to), and the button in the preview panel will also say 'Tutorials'. This is your first button for your menu!
While you're under the 'General' link, set a value for 'Item width'. I chose 130. Make sure you choose a width that will allow for all the text on the button, or you'll get freaky widths from the dropdown menu items when you hover over the top level button! Setting the width allows all buttons to be the same width. If you would prefer they sized to the text on the button, leave the width out.
Now we change the background colour of the button. In the 'Tasks' panel, choose 'Background'. In the mouseout section, change the colour to the colour you want the colour of your button. In the mouseover section, change it to the colour you want the button to be when the mouse hovers over it. Set the colour, then mouse over the button in the Preview Pane to see what it does.
Click on 'Font' in the Tasks Pane. In the Properties Pane the settings come up for the font on mouseout as well as on mouseover. Change these settings to whatever you wish, then give your button in the Preview Pane a mouseover to see what changes were made.
That's all the changes I'm going to make to my menu, although if you have a click through the links in the Tasks Pane you will see other settings you can change.
You can do this two different ways. Either right click Top-level Menu and choose 'Append sub menu item' or hightlight the home button, right click and choose copy, then highlight Top-level Menu and right click and choose paste. Make sure both of the buttons are lined up underneath each other in the Menu Tree, this puts them on the same level. Change the text to how you want it.
Repeat this step for the third button.
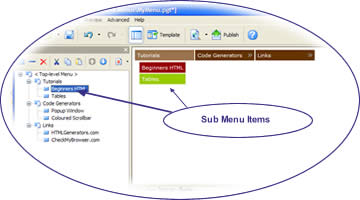
Creating sub-menu items
These are the menu items that will drop down when you hover over one of the top level buttons.
Right click on the first button in the Menu Tree and choose 'Append Sub Menu Item'. A 'Menu Item 1' will appear indented underneath the first button in the Menu Tree. Also, if you hover over your first button in the Preview Pane, you should have a menu item appear beneath it. Click on the new ''Menu Item 1' in the Menu Tree and the properties for that menu item will appear in the Properties Pane. Change the text to what you want it to, the same way you did with the top level menu buttons.
To make these buttons link, click on the Sub Menu Item in the Menu Tree and enter a url in the 'link' section under the 'General' link in the Tasks Pane. Keep in mind, the demo version will only allow you to insert 3 links. If you're spiffy with Javascript, you can hand edit the generated js and place extra links in.
Sub Menu Item settings
Another change that happens when you append a Sub Menu Item is that new links show up in the Tasks Pane for the 'Turorials' button (or whatever you called yours). This is the Popup Menu Settings link. Click on the Tutorials button and then click the 'Popup Direction' link. This allows you to set which direction the Sub Menu Items will open in, as well as the X and Y co-ordinates of the Sub Menu Items. This states the 'indented' amount horizontally and vertically of the drop-down menu items. I have changed the X-coordinate to 10 and the Y-coordinate to 2.
Click on the 'General' link and set 'display' to vertical. This allows a list of Sub Menu Items to be stacked vertically when they open.
After you add a Sub Menu Item, the top button wins itself an arrow to indicate there are Sub Menu Items. You can change this by clicking on 'Arrow' in the Tasks Pane of the 'Tutorials' button. This allows you to choose an image for the arrow, as well as an image for the arrow on mouseover. I chose the 'right_disabled.gif' arrow from the stock arrow collection that comes with the program. Of course, I could create my own arrows in a graphics program if I wanted something different, or set no arrows at all. I set the mouseover arrow image to nothing (just deleted the text from the 'Image' text field)
The same way you created more top level menu buttons, create more Sub Menu Items. Either right click on the first Sub Menu Item and choose 'Insert item before' or right click on the 'Tutorials' button and choose 'Insert Sub Menu Item' or just right click the Sub Menu Item you have created, choose copy then right click the 'Tutorials' button and choose 'paste'. Click on the new Sub Menu Item in the Menu Tree and choose the properties just like you did the first one. You'll be looking at changing the link and the text, you shouldn't need to change much more than that.
Repeat this step for as many Sub Menu Items as you want on the Tutorials button.
Create Sub Menu Items for the rest of the Top Level Buttons
The easiest way to create Sub Menu Items for the rest of the buttons is to right click a Sub Menu Item from the 'Tutorials' button in the Menu Tree and choose 'copy', then right click the button in the Menu Tree where you want the new Sub Menu Item to be, and click 'paste'. You then click on the new Sub Menu Item in the Menu Tree and change the text, link, background etc as you need. Repeat this step for all the buttons.
Adding a bit of style to the DHTML menu
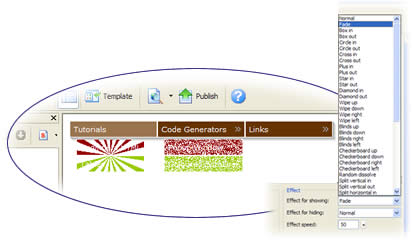
If you've followed all the steps above, you've got a DHTML menu working in the preview pane. We can now add some effects to it to make it look real jazzy.
Click on 'Top-level Menu' in the Menu Tree. In the Tasks Pane, click the 'Effect' link under 'Popup Menu Settings'. There are several settings you can change in here, have a play and view the results in the Preview Pane. I'm going to choose 'Complex' from the Shadow type box, and set the Shadow size to 5. I also set the 'Effect for showing' to Fade in, which means when someone first loads the page the menu will fade in instead of just appearing.
I also went to each of the top level buttons (Tutorials, Code Generators and Links) and set an effect on them. I chose several different types for the 'Effect for showing', but chose Random dissolve for 'Effect for hiding' for each of them. I also chose complex for the Shadow type, and a Shadow depth of 3.
Inserting the DTHML menu into your webpage
This is the fun bit - actually placing the code into your webpage. First of all, you'll want to 'save as' and save your DHTML menu. This allows for future edits in case you wish to add/remove some links, or just to change colours etc. The steps below are what you need to follow to generate the code needed for your DHTML menu:
Click on 'file' in the application menu (top left) then click on 'publish'. A box comes up with 'Welcome to the Publish Wizard' on it. Click 'Next'.
You are given 4 options on the next screen. If you know what you're doing with Javascript, you don't need me to tell you how to do it and you'll probably manage quite OK on your own from here. If you don't know Javascript, choose the third option, 'Create a JavaScript (*.js) include file. This is about the easiest method to use. Click 'Next'.
Here you need to put in a path. Click 'browse' and navigate to where your web pages are stored on your system, or just create a folder in My Documents and navigate to that. Give the file a name of 'menu' or whatever else you'd like it called (it really doesn't matter). Once you've navigated to the directory and entered a file name, click 'save'. The path you see should then look something like: C:\DHTMLMenus\menu.js, of course it will be the path of where you chose to save the file. Click 'Next'.
The program gives you two pieces of code to copy and paste. This code goes into your webpage. The first piece of code goes between the tags of your webpage. The second piece of code goes where you'd like your menu placed. Place this code into your webpage then click 'Next'.
The next screen gives you the option of copying the resource files. You will need to do this to copy the stm31.js file into the directory where you've chosen to save the js, as well as any images you've used in your menu. Make sure the checkbox is ticked for 'I want to copy the resource files now', then click 'Next'.
You now get a screen stating the resource files and HTML page need to be placed in the same directory. Navigate to the directory where you chose to save the js, then click 'Next'.
The program should copy files to the directory you chose, and you should then be able to go to your HTML file, open it and use the menu. If your webpage is not stored in the same folder that you saved the js files in, then you need to copy all of these files and put them into the same folder as your webpage. If your webpage is on the internet, upload the files to the same directory as the webpage you want the menu placed on.
Wrapup
There are many different menu styles you can choose from, this is a very basic style I chose to demonstrate. When you are starting a new menu, click the 'Template' button. You will then see the many different styles of DHTML menus you can create from a template.
Dunno about you, but I totally love this program!
Download DHTMLMenu here